Vertical video from an action camera
There are three ways to get a vertical clip out of a camera built for horizontal, and two of them throw away most of the frame.
Part of Filming.
We earn a commission if you buy through our links, at no extra cost to you. It never changes what we recommend or the order we rank it in — how this works.

The best way to get vertical video from an action camera is to rotate the camera 90 degrees and shoot it natively, because that uses the full sensor height instead of cropping it away. Current GoPro, DJI and Insta360 cameras detect the rotation and record a true 9:16 file with stabilization and horizon leveling intact. The two alternatives both cost resolution: cropping a 16:9 clip to vertical in an edit discards roughly two-thirds of the width, and shooting a 4:3 or wide mode to crop later keeps more but still throws pixels away. The one exception is a 360 camera, where a vertical and a horizontal cut come out of the same recording with no compromise to either.
Why this is a real question
Action cameras were designed around a horizontal frame, and almost everything about them assumes it: the mount sits under a landscape body, the screen is landscape, the field of view is wide rather than tall. Meanwhile most of the footage people shoot now gets watched on a phone held upright.
The result is a lot of vertical video that was cropped out of the middle of a horizontal clip — which means the subject is cut off at the sides, the resolution is a third of what was recorded, and the wide angle that made the shot interesting has been thrown away. There are better options, and they are mostly free.
The three methods, and what each costs
1. Rotate the camera and shoot native 9:16. Turn the camera 90 degrees on its mount. Current cameras detect the orientation and write a genuine vertical file; stabilization and horizon lock keep working, and you use the full height of the sensor. This is the method that loses nothing, and it is the right default if you know in advance that the clip is for a phone.
The one real catch is mounting. A GoPro-standard two-prong mount under a rotated camera puts the body sideways on the harness or the bar, which can foul a strap, block a button, or sit at an awkward angle on a clamp. GoPro and DJI both sell vertical mounting buckles for exactly this, and a 1/4-20 thread plus a small ball head solves it generically. Check the fit before the day, not at the trailhead — the mount compatibility map is in what actually fits what.
2. Shoot wide or 4:3 and crop in the edit. The compromise method, and a good one when you do not know yet where the clip is going. A 4:3 or full-sensor mode records a taller frame than 16:9, so the vertical crop out of it keeps more pixels and more of the subject's head and feet. You still lose width, but you lose less, and you keep the option of a horizontal cut from the same file.
3. Reframe a 360 recording. The only method with no trade-off at all. A 360 camera records a sphere; the vertical cut and the horizontal cut are both just choices you make afterwards in the app, at full quality, from one recording. For anyone who genuinely needs both aspect ratios from the same day, this is the honest answer — and it is one of the stronger arguments for the format. The cost is the reframing pass, which is real work per clip: 360 camera vs action camera sets out the trade, and how to edit on a phone covers doing it on a handset.
| Method | Resolution kept | Decide when | Main drawback |
|---|---|---|---|
| Rotate the camera, shoot 9:16 | All of it | Before you shoot | Awkward mounting; no horizontal cut |
| Shoot 4:3 or wide, crop later | Most of it | In the edit | Still loses width; needs a taller mode |
| Crop a 16:9 clip to 9:16 | About a third | In the edit | Subject cut off; softest result |
| Reframe a 360 recording | All of it, both ways | In the edit | A reframing pass on every clip |
Settings for vertical, specifically
Use linear or wide, not the widest field of view. In a tall narrow frame the widest setting bends the vertical edges noticeably, which looks far worse than the same distortion does in a horizontal frame. Linear is the flattering choice for vertical.
Keep horizon lock on. This matters more in vertical than in horizontal, because a tall frame exaggerates roll. A few degrees of tilt that would pass unnoticed in 16:9 is obvious in 9:16.
4K is plenty; frame rate beats resolution. A vertical clip on a phone is watched at a fraction of 4K. Spend the bitrate on 60 frames per second instead so you have clean half-speed, which is most of what short vertical video does with motion.
Get closer, and frame higher. A vertical frame has almost no room sideways and a lot of room up and down. That changes composition: subjects need to be nearer, and the interesting part of the frame is usually the top two-thirds, because the bottom is where phone interfaces put buttons and captions.
Leave the bottom fifth of the frame boring. Every platform overlays something there. Keep faces, horizons and the subject out of it.
Where vertical genuinely works, and where it does not
It works for anything tall and close. A person, a climb, a waterfall, a bike on a steep descent, a paddle entering water right in front of the lens. Vertical framing is flattering to height and to proximity, and action cameras are very good at proximity.
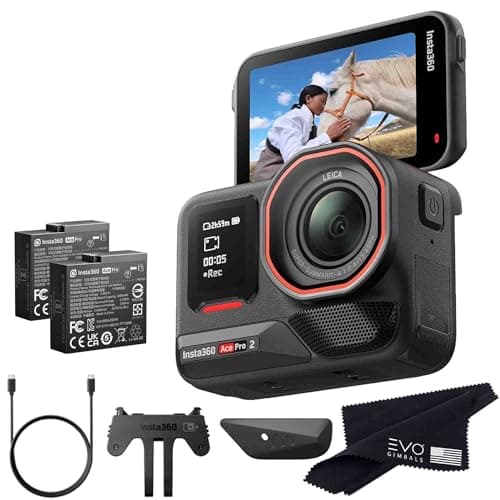
It works for selfie-style and chest-mounted shots. A chest-mounted camera in portrait frames your hands and the trail ahead in a way that reads naturally on a phone. The flip screen on the Insta360 Ace Pro 2 in our picks is a real advantage here, because framing a vertical self-shot blind is guesswork.
It does not work for landscape. A lake, a ridge line, a wide beach — the thing that makes those shots is width, and vertical removes it. Shoot those horizontally and accept that they are for a different edit.
It does not work for anything you will want on a television. A 9:16 clip on a TV is a small strip with black bars either side, and there is no fixing it after the fact. If the footage is a family record rather than a post, shoot horizontal.
The practical workflow if you want both
Most people do not want to choose. The approach that works without doubling the shooting:
Shoot the day horizontally in a tall mode — 4:3 or the camera's full-sensor option — so there is vertical crop room in every clip. Then build the vertical edit first, because it is the harder constraint, and derive the horizontal version from the same selects afterwards. Doing it the other way round means re-cutting everything.
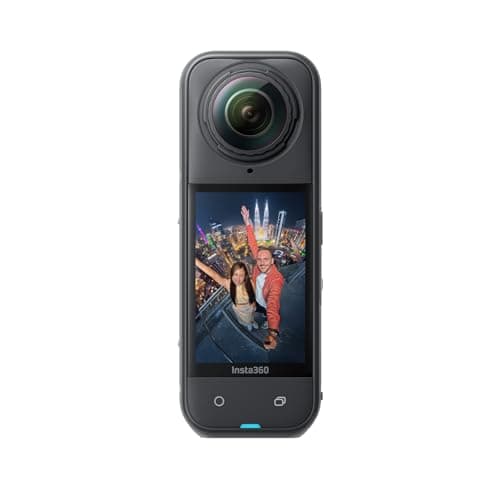
Or shoot 360 and stop thinking about it. One recording, two aspect ratios, full quality in both, at the cost of a reframing pass. For somebody posting regularly that trade usually comes out ahead, which is why the Insta360 X5 is first in our picks on this page rather than a flat camera.
Either way, decide the aspect ratio before you start assembling a timeline. Changing it halfway is the single most frustrating job in video editing, on a phone or anywhere else.
01
The three cameras that handle vertical differently
A 360 camera that produces vertical and horizontal from the same recording, a flat camera with a flip screen so you can see the vertical frame, and the camera most people already own.
- IP68 to 49ft (15m)
- 2400mAh · ~88 min at 8K30
- User-replaceable
- 9.5
- 9.5
- 9.0
- 8.5
- 7.5
Insta360 X5
Insta360
15m rated, replaceable lenses, and the one camera that means you never have to aim while you are paddling.
Anyone filming themselves on the water who cannot stop to frame a shot
- 15m IP68 is the deepest bare rating of any camera on this site
- User-replaceable lenses — the single biggest fix for the 360 format's worst failure mode
- 185 minutes in Endurance mode at 5.7K24, which is a whole day of clips
- Invisible-selfie-stick reframing means you point the camera at nothing and pick the angle later
- Exposed lenses still scratch; lens guards are a purchase, not an option
- Every clip needs a reframing pass before anyone else can watch it
- 8K30 files are large and the edit is slower than flat footage
Specs from CineD, Insta360 X5 announcement with published specifications.
- 39ft (12m) / 60m with dive case
- 1800mAh · 180 min published
- 1/1.3" with Leica lens
- 8.5
- 8.5
- 9.0
- 7.5
- 9.5
Insta360 Ace Pro 2
Insta360
The best-looking image of the three flagships, with a flip screen that finally makes a chest-mounted shot something you can frame.
Family trips where you want the footage to look like more than dashcam clips
- 8K30 with a 1/1.3-inch sensor — the most detail in the group
- 12m bare, which clears every snorkel depth without a housing
- 180-minute published battery life and 80% charge in 18 minutes
- Flip screen means you can frame a shot you are standing in front of
- 12m is still short of the DJI's 20m
- The dive case is a separate purchase for anything past 12m
- Fewer mount options than GoPro, and an adapter tax if you switch
Specs from Insta360 Ace Pro 2 published specifications.
- 33ft (10m), no housing
- 1900mAh Enduro
- 1.5h at 5.3K30 / 2.5h at 1080p30
- 8.0
- 9.5
- 8.5
- 9.5
- 9.0
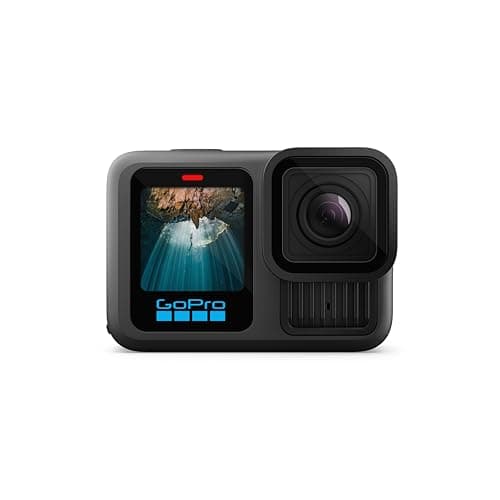
GoPro HERO13 Black
GoPro
The safest default for lake and trail: 33ft without a housing, the steadiest footage in the category, and a mount for literally everything.
Anyone who wants one camera to handle the kayak, the bike and the family trip
- HyperSmooth 6.0 with AutoBoost is the steadiest stabilization we can find published figures for
- Built-in mounting fingers plus 1/4-20 threads — it fits the GoPro ecosystem and a normal tripod
- Enduro battery is rated to keep full camera functionality down to 14°F (-10°C)
- Replaceable lens cover, so a scratched lens is a $20 problem and not a $400 one
- 33ft is shallower than the DJI and it is the shallowest of the three flagships
- Anything past 33ft needs the separate Protective Housing
- HB-Series lenses and ND filters are all extra purchases
Specs from GoPro HERO13 Black published specifications.
02
How we picked
We do not lab-test, bench-test or dive-test cameras, and we do not own test units. What we do instead is read the manufacturer's published specifications, read the independent reviews that genuinely do test, read owner reports for the failure modes specs never mention — fogging, salt corrosion, cold battery collapse, mount slippage — and then weight all of it for 360 cameras used on lake and trail. Where a number is not published, the page says “not published” rather than filling the cell.
The full method, including what we refuse to do, is on the editorial policy page.
- 30%Water survival
- Exposed lenses change the rules — rated depth and lens-guard availability both count.
- 25%Reframing payoff
- A 360 camera is only worth it if the reframing genuinely saves shots you would have missed.
- 20%Battery in the cold
- Stitching two sensors costs power; cold costs more.
- 15%Mount ecosystem
- Invisible-selfie-stick geometry is the whole trick, and it depends on the mount.
- 10%Edit time
- Every 360 clip needs a pass before anyone can watch it.
03
Questions people actually ask
01Can an action camera shoot vertical video?
Yes. Rotate the camera 90 degrees on its mount and current GoPro, DJI and Insta360 cameras detect the orientation and record a true 9:16 file, with stabilization and horizon leveling still working. That uses the whole sensor height instead of cropping it away.
02Is it better to shoot vertical or crop afterwards?
Shoot vertical if you know the clip is for a phone — cropping a 16:9 file to 9:16 discards roughly two-thirds of the width. If you are unsure, shoot a 4:3 or full-sensor mode, which keeps enough height to crop vertically later without losing as much.
03What settings should I use for vertical action camera video?
Linear or wide field of view rather than the widest, horizon lock on, 4K/60 rather than a higher resolution at 30fps, and the orientation locked to portrait so the camera cannot switch back mid-session.
04How do I mount an action camera vertically?
With a vertical mounting buckle, which GoPro and DJI both sell, or generically with a 1/4-20 thread and a small ball head. A standard two-prong mount under a rotated camera can foul straps and block buttons, so check the fit before the day rather than at the trailhead.
05Can you get vertical and horizontal video from the same recording?
Only with a 360 camera. It records a sphere, so the vertical and horizontal cuts are both choices you make afterwards at full quality. With a flat camera you are always trading one against the other.
06Why does my vertical footage look distorted?
Because you are using the widest field of view. A tall narrow frame exaggerates the bending at the vertical edges far more than a horizontal frame does. Switch to linear.
04
Read this next
How to edit action camera footage on a phone
Where the vertical and horizontal decision gets made, and which app to make it in.
360 camera vs action camera
The only format that gives you both aspect ratios from one recording.
Editing a trip video people watch
Structure for the longer, horizontal version of the same footage.
What actually fits what
Vertical mounting buckles, 1/4-20 threads and what fouls a strap.
HyperSmooth vs FlowState vs RockSteady
Horizon lock matters more in a tall frame. This is what each system does.
05
Sources
- CineD, Insta360 X5 announcement with published specifications
- Insta360 Ace Pro 2 published specifications
- GoPro HERO13 Black published specifications
Specifications are quoted from the manufacturer pages above as they read on the dates shown. Where a figure is not published, this site says so rather than estimating one. We have not tested these products.